We can deploy/delete components using Change Set(Deploy Only), Force.com IDE or Eclipse, ANT Tool.
This article I am going to explain how to delete a unused components such as Class/Page/Trigger/Object, etc using destructiveChanges.xml in Workbench.com.
Step 1: Create package.xml file with the below content,
Step 2: Create destructiveChanges.xml with the below content, Here I am going to delete a Apex Class named as "AccountHandler"
You can find list of Metadata types from the below link,
https://developer.salesforce.com/docs/atlas.en-us.api_meta.meta/api_meta/meta_types_list.htm
Step 3: Add package.xml and destructiveChanges.xml file into zip file or Compress those two files into zip.
Note: To delete files, create a delete manifest that’s called destructiveChanges.xml. The format of the delete manifest is the same as package.xml, except that wildcards aren’t supported.
Step 4: Login to the Workbench.com using the below link,
https://workbench.developerforce.com/
Step 5: Click on the Migration tab --> Select Deploy
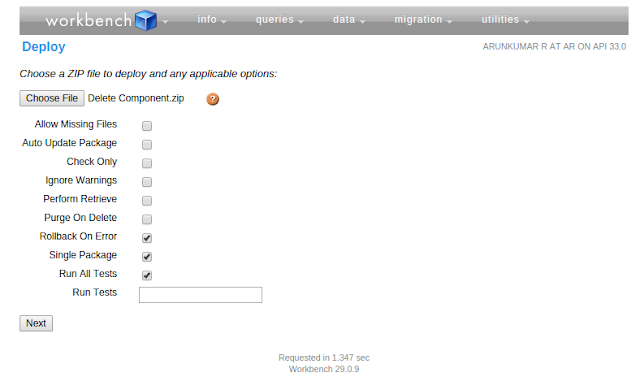
Step 6: Choose File --> Select the created zip file from the above.
Step 7: Check the below options,
Rollback On Error
Single Package
Run All Tests
Step 8: Click Next and Select Deploy.
After the deployment, you will get the detailed result like below,
References:
Deleting File from Organization
Carving The Clouds
This article I am going to explain how to delete a unused components such as Class/Page/Trigger/Object, etc using destructiveChanges.xml in Workbench.com.
Step 1: Create package.xml file with the below content,
- <?xml version="1.0" encoding="UTF-8"?>
- <Package xmlns="http://soap.sforce.com/2006/04/metadata">
- <version>34.0</version>
- </Package>
Step 2: Create destructiveChanges.xml with the below content, Here I am going to delete a Apex Class named as "AccountHandler"
- <?xml version="1.0" encoding="UTF-8"?>
- <Package xmlns="http://soap.sforce.com/2006/04/metadata">
- <types>
- <members>AccountHandler</members>
- <name>ApexClass</name>
- </types>
- </Package>
You can find list of Metadata types from the below link,
https://developer.salesforce.com/docs/atlas.en-us.api_meta.meta/api_meta/meta_types_list.htm
Step 3: Add package.xml and destructiveChanges.xml file into zip file or Compress those two files into zip.
Note: To delete files, create a delete manifest that’s called destructiveChanges.xml. The format of the delete manifest is the same as package.xml, except that wildcards aren’t supported.
Step 4: Login to the Workbench.com using the below link,
https://workbench.developerforce.com/
Step 5: Click on the Migration tab --> Select Deploy
Step 6: Choose File --> Select the created zip file from the above.
Step 7: Check the below options,
Rollback On Error
Single Package
Run All Tests
Step 8: Click Next and Select Deploy.
After the deployment, you will get the detailed result like below,
References:
Deleting File from Organization
Carving The Clouds


No comments:
Post a Comment