Tuesday 14 July 2015

System.QueryException: Aggregate query has too many rows for direct assignment, use FOR loop

           This exception is sometimes thrown when accessing a large set of child records (200 or more) of a retrieved sObject inside the loop, or when getting the size of such a record set. For example, the query in the following SOQL for loop retrieves child contacts for a particular account. If this account contains more than 200 child contacts, the statements in the for loop cause an exception.


  1. for (Account acct : [SELECT Id, Name, (SELECT Id, Name FROM Contacts) FROM Account LIMIT 100])
  2. {
  3.         // Assigning inner query values to List, checking list size , null conditions within the for loop leads the query exception
  4.         List<Contact> contactList = acct.Contacts;  
  5.         Integer count = acct.Contacts.size();
  6.         if(acct.Contacts.size() > 0)
  7.         {
  8.        
  9.         }
  10.         if(acct.Contacts != null)
  11.         {
  12.        
  13.         }
  14. }


To avoid getting this exception, use a for loop to iterate over the child records, as follows.

  1. for (Account acct : [SELECT Id, Name, (SELECT Id, Name FROM Contacts)
  2.                     FROM Account LIMIT 100])
  3. {                                      
  4.     Integer count=0;
  5.     for (Contact c : acct.Contacts)
  6.     {
  7.         count++;
  8.     }
  9. }

Reference: 

https://developer.salesforce.com/docs/atlas.en-us.apexcode.meta/apexcode/langCon_apex_loops_for_SOQL.htm

Wednesday 8 July 2015

List of Indexed Field in Salesforce

     Indexed fields are used to build a SOQL queries in more efficient way. Here is the list of indexed fields in salesforce.

The following fields are indexed by default.
  1. Primary keys (Id, Name, and Owner fields)
  2. Foreign keys (lookup or master-detail relationship fields)
  3. Audit dates (such as LastModifiedDate)
  4. Custom fields that are marked as External ID or Unique

You can also find the Indexed Field from the list of field option. 


You can also checkout the usage of index fields from the below link,

Tuesday 7 July 2015

Rollup Summar trigger for a Lookup Relationship in Salesforce

      Here is the sample Roll-up Summary calculation trigger for Lookup relationship. The below trigger do a Sum Operation using Aggregate Query.

Parent: Account
Child: Contact
Logic: Update parent record field called Total__c with Sum of all related child records Amount__c field value.

  1. trigger TotalAmountTrigger on Contact (after insert, after update, after delete, after undelete)
  2. {
  3.     Set<Id> accountIds = new Set<Id>();
  4.     for(contact c: Trigger.isDelete? Trigger.old : Trigger.new){
  5.         if(c.AccountId != null)
  6.         {
  7.             accountIds.add(c.AccountId);
  8.         }
  9.     }  
  10.     List<Account> accList = new List<Account>();
  11.     for(AggregateResult currentAggResult:[SELECT AccountId accId, SUM(Amount__c) sumAmt FROM Contact  WHERE AccountId in:accountIds GROUP BY AccountId])
  12.     {
  13.         Account acc = new Account();
  14.         acc.Id = (Id)currentAggResult.get('accId');
  15.         acc.Total__c = (Decimal)currentAggResult.get('sumAmt');
  16.         accList.add(acc);
  17.         accountIds.remove((Id)currentAggResult.get('accId'));
  18.     }
  19.    
  20.     for(Id currAccId : accountIds)
  21.     {
  22.         Account acc = new Account();
  23.         acc.Id = currAccId;
  24.         acc.Total__c = null;
  25.         accList.add(acc);
  26.     }
  27.     update accList;
  28. }


Friday 3 July 2015

Calculate number of Business Days between two dates except holidays and weekends in Salesforce

          The below code will find the number of business days between two days. Change the below code according to your requirement.

         By default, I have assigned Saturday and Sunday as default weekend. Change this code according to your requirement.

  1. public class BusinessDayCalculation
  2. {
  3.     public static Integer calculateWorkingDays(Date startDate, Date endDate)
  4.     {        
  5.         Set<Date> holidaysSet = new Set<Date>();
  6.        
  7.         for(Holiday currHoliday : [Select ActivityDate from holiday])
  8.         {
  9.             holidaysSet.add(currHoliday.ActivityDate);
  10.         }
  11.        
  12.         Integer workingDays = 0;
  13.        
  14.         for(integer i=0; i <= startDate.daysBetween(endDate); i++)
  15.         {
  16.             Date dt = startDate + i;
  17.             DateTime currDate = DateTime.newInstance(dt.year(), dt.month(), dt.day());
  18.             String todayDay = currDate.format('EEEE');
  19.             if(todayDay != 'Saturday' && todayDay !='Sunday' && (!holidaysSet.contains(dt)))
  20.             {
  21.                 workingDays = workingDays + 1;
  22.             }
  23.         }
  24.        
  25.         System.debug('--Working days'+workingDays);
  26.         return workingDays;
  27.     }
  28. }


Deleting Components from Production or Destructive Changes Using Workbench in Salesforce

We can deploy/delete components using Change Set(Deploy Only), Force.com IDE or Eclipse, ANT Tool.

This article I am going to explain how to delete a unused components such as Class/Page/Trigger/Object, etc using destructiveChanges.xml in Workbench.com.

Step 1: Create package.xml file with the below content,

  1. <?xml version="1.0" encoding="UTF-8"?>
  2. <Package xmlns="http://soap.sforce.com/2006/04/metadata">
  3.     <version>34.0</version>
  4. </Package>

Step 2: Create destructiveChanges.xml with the below content, Here I am going to delete a Apex Class named as "AccountHandler"

  1. <?xml version="1.0" encoding="UTF-8"?>
  2. <Package xmlns="http://soap.sforce.com/2006/04/metadata">
  3.     <types>
  4.         <members>AccountHandler</members>
  5.         <name>ApexClass</name>
  6.     </types>
  7. </Package>

You can find list of Metadata types from the below link,
https://developer.salesforce.com/docs/atlas.en-us.api_meta.meta/api_meta/meta_types_list.htm

Step 3: Add package.xml and destructiveChanges.xml file into zip file or Compress those two files into zip.

Note: To delete files, create a delete manifest that’s called destructiveChanges.xml. The format of the delete manifest is the same as package.xml, except that wildcards aren’t supported.

Step 4: Login to the Workbench.com using the below link,
https://workbench.developerforce.com/


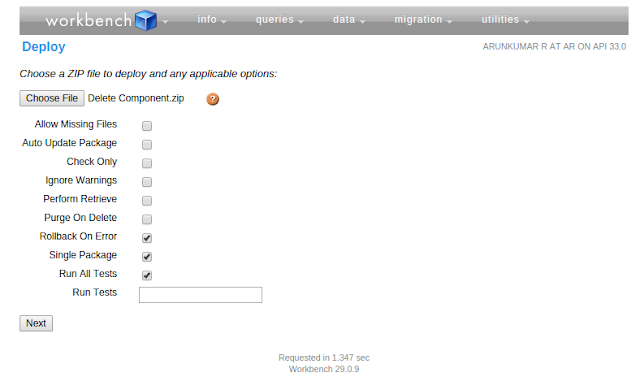
Step 5: Click on the Migration tab --> Select Deploy

Step 6: Choose File --> Select the created zip file from the above.

Step 7: Check the below options,
Rollback On Error
Single Package
Run All Tests


Step 8: Click Next and Select Deploy.


After the deployment, you will get the detailed result like below,


References:

Deleting File from Organization
Carving The Clouds

Activities: Assign Tasks to a Queue Salesforce Lightning

Salesforce announced to assign Tasks to a Queue beginning from Spring'20 release. How does it work? In Setup, enter Queues in th...